Blog
-
Posted: August 30, 2017Read more »
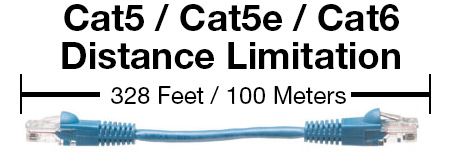
Cat5 cable is a standard term for twisted pair cable commonly used for connecting PCs and hardware to different equipment. It has been replaced by Cat5e, which is an enhanced version of Cat5. These share many of the same physical characteristics including distance limitations, but Cat5e is designed for faster networking speeds and reduced crosstalk interference. The maximum length you can run Cat5, Cat5e, Cat6 and Cat6a cable is 100 meters or 328 feet. If you require a longer run, you will need to put an active component, such as a router, in-between the signals.
The length limit for Cat5 also includes any patch cables, jacks or couplers that are connected in the run. For example, you could not run 100 meters of Cat5 cable between the walls, and then connect with a jack to another 10 meter cable. In terms of distance limitation, the 100 meters of Cat5, the jack and additional 10
meters of Cat5 are all seen as a single length of cable. It is recommended to only run the structured cabling (the horizontal cabling or the infrastructure cabling) 90 meters to give adequate length for end users patching into the network jacks.
Although Cat5 has been eclipsed by Cat5e and now Cat6 cables, the Cat5e and Cat6 max length distance limitation remains unchanged. If you need to go farther than 100 meters and can’t add an active component, you will need to use fiber optic cable. Depending upon the type of fiber you use, the distance limitation can be up to 10 kilometers. By using a
-
Posted: August 30, 2017Read more »
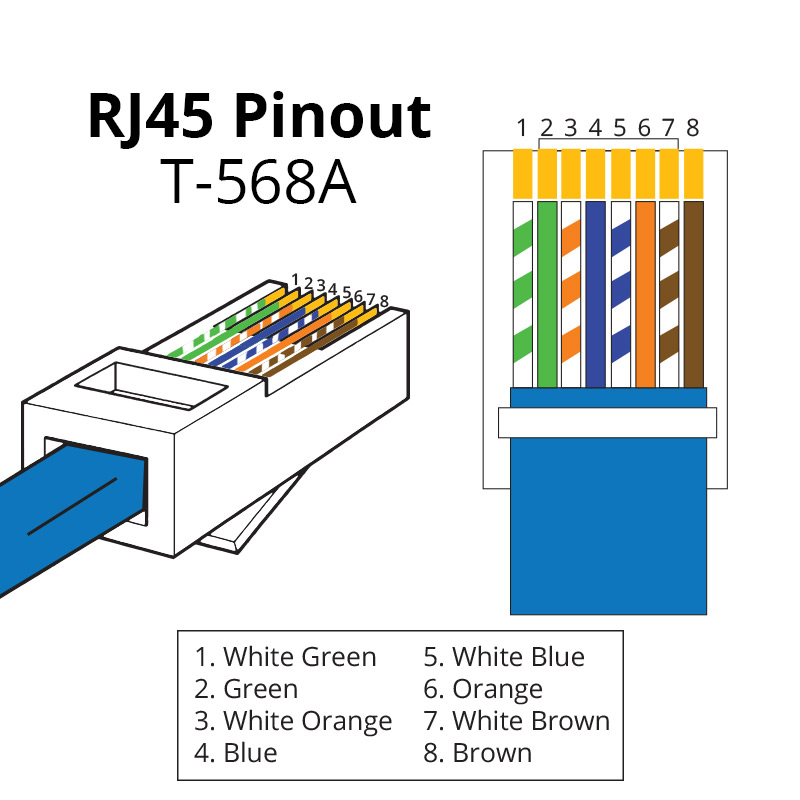
A RJ45 connector is a modular 8 position, 8 pin connector used for terminating Cat5e or Cat6 twisted pair cable. A pinout is a specific arrangement of wires that dictate how the connector is terminated. There are multiple pinouts for RJ45 connectors including straight through (T568A or T568B), crossover, rolled, T1, and loopback. Straight through is the most common type of cable and is used for connecting your computer to your network. The other pinouts are for specialty cables that are used for unique network applications. Straight-Through Pinout Within the family of straight-through color codes, there are two standards recognized by ANSI, TIA and EIA. The first is the T568A wiring standard and the second is T568B. T568B has surpassed 568A and is seen as the default wiring scheme for twisted pair structured cabling. If you are unsure of which to use, choose 568B.
T-568A RJ45 Pinout
 T-568B RJ45 Pinout
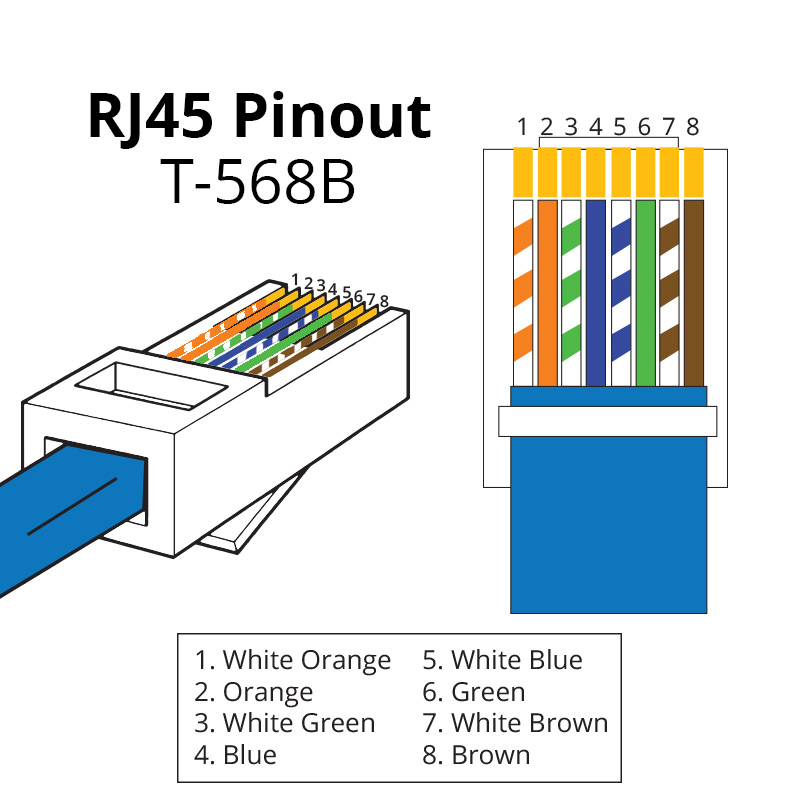
Cross Over Pinout
A crossover cable utilizes two different RJ45 pinouts for the two ends of the cable. If you need to connect 568A equipment to 568B you can use a crossover cable.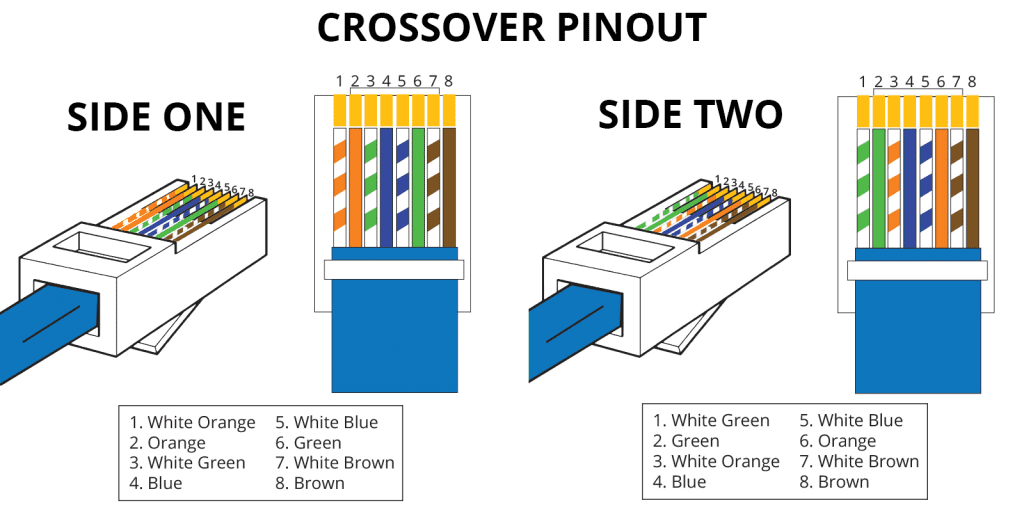
-
Posted: August 30, 2017Read more »
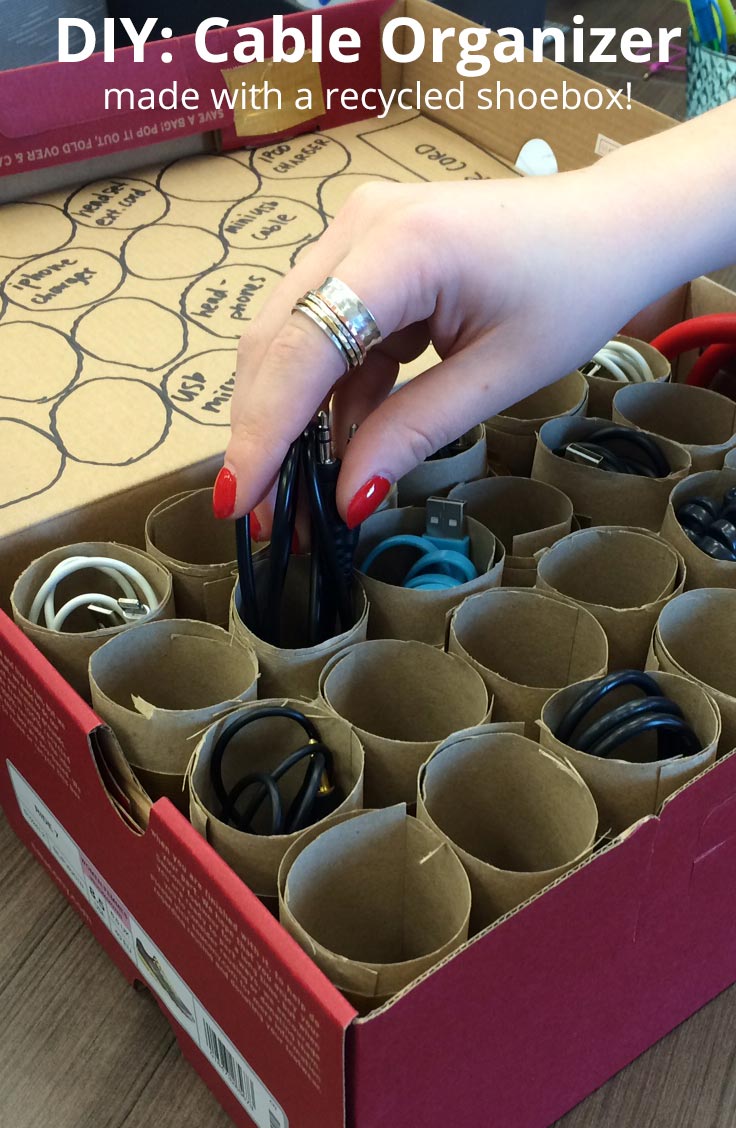
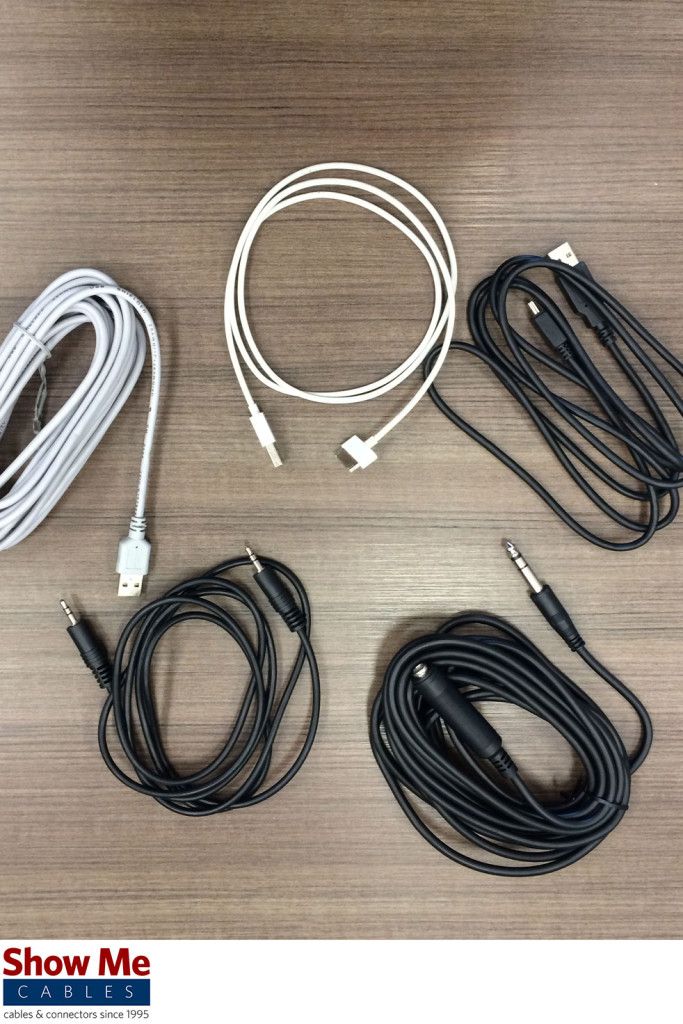
With each purchase of a new gadget comes a plethora of charging cables. It’s easy to absent-mindedly throw everything into a drawer to be sorted or used later. But that method inevitably results in a tangled mess of cables and cords that rivals that of Clark Griswold’s Christmas lights. Here’s a better way to stow away those extra cords so that the next time you need them, you won’t have to battle The Cable-Spaghetti Monster.
What You’ll Need:
- Shoebox
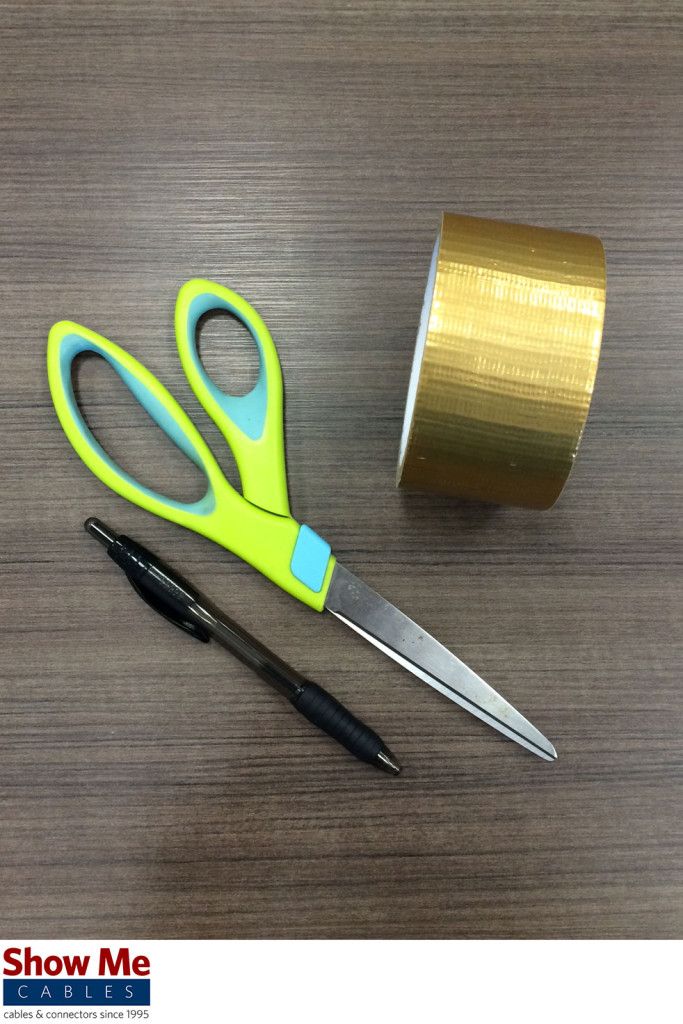
- Scissors
- Tape (ours is fancy gold duct tape)
- A pen/permanent marker
- Cardboard roll (from TP, gift wrap, etc.)
- Cables!
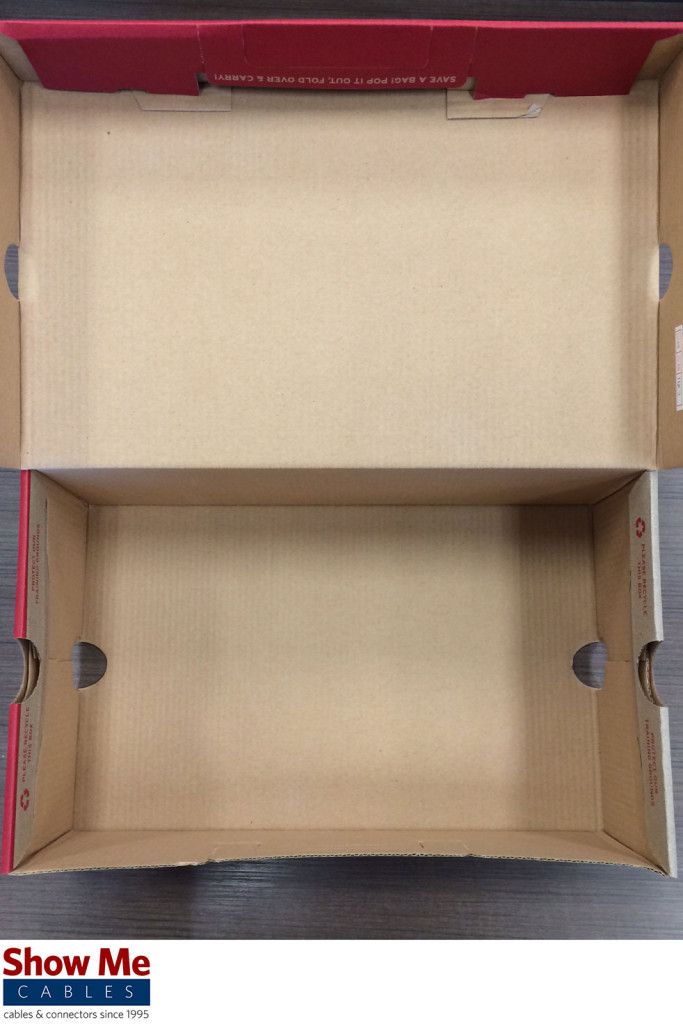
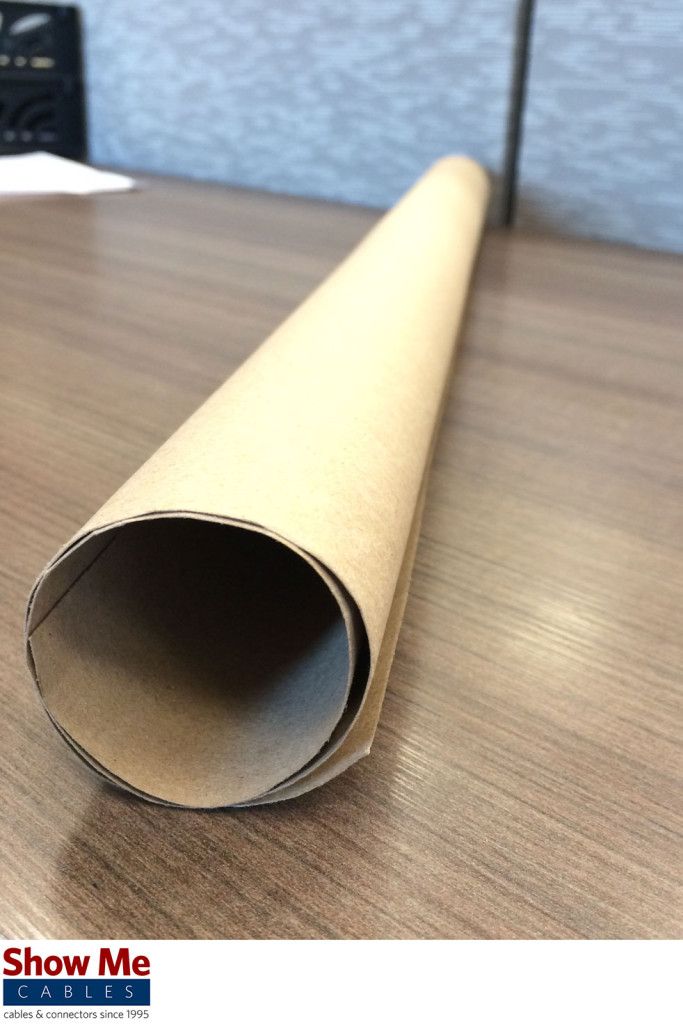
Step 1. Measure and Cut
Grab your cardboard roll and place inside your shoebox so that you can measure how tall to cut each section. We used a pen to mark the height. Once you’ve made your marks, cut away! Keep cutting segments until you have enough to fill up the inside of your shoebox. Ours took 4 rows of 6, or 24 rolls.

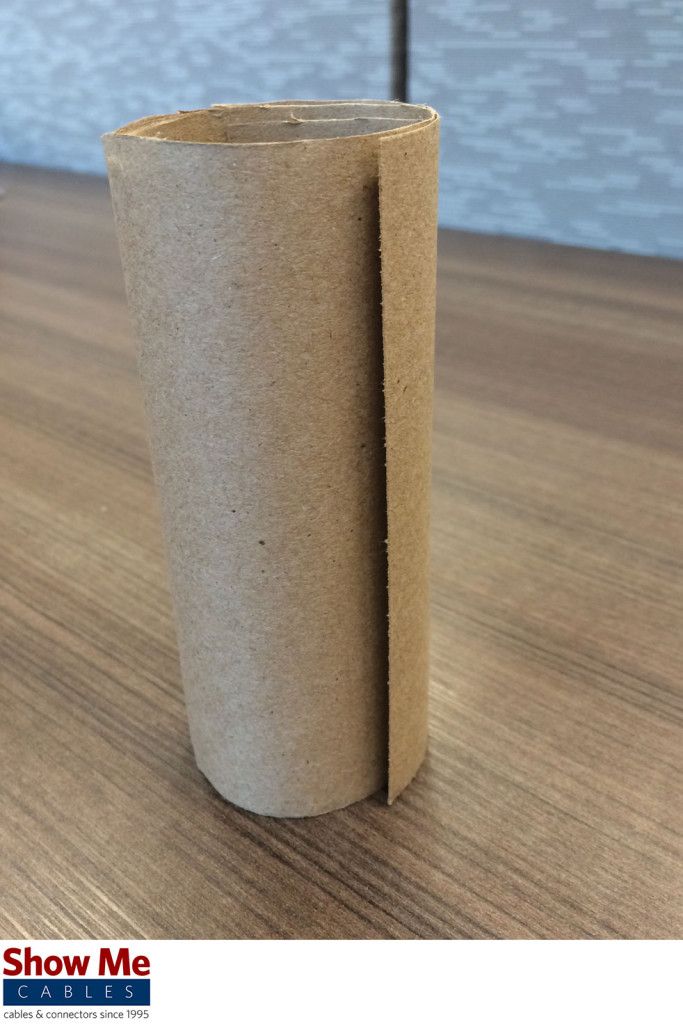
Step 2. Add Stability
Add tape to make your cardboard rolls sturdier. We used our tape to make pods of 4 rolls. Then, we attached our pods to each other to create one,
-
Posted: August 30, 2017Categories: ConnectorRead more »
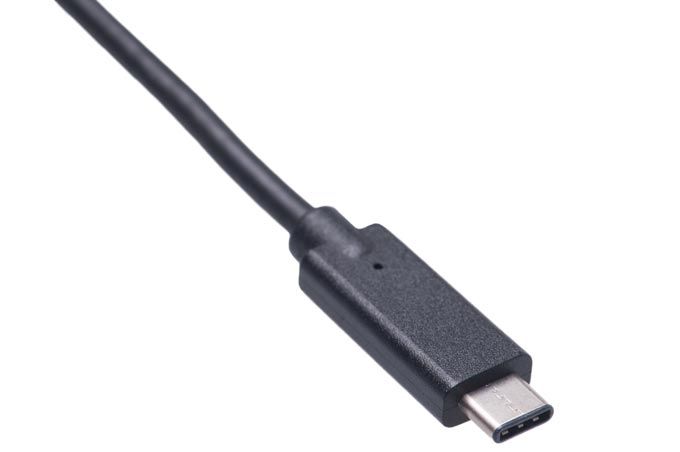
Apple recently unveiled its newest MacBook Pro, announcing that it would use a single USB Type-C port for power and data transfer. USB Type-C has since been the topic of conversation in the tech world, paving the way for exciting possibilities for improved USB standards and devices.
What is USB Type-C?
Type-C is a new shape of USB connector which is double-sided with 24-pins. It is reversible, a huge improvement to any of us who have once fumbled with plugging a Type-A connector into a port. While Type-C itself is only a change in shape, the excitement lies in the potential for improved standards. The underlying technology of Type-C could be anything from the outdated USB 2.0 to the latest and greatest USB 3.1 and USB Power Delivery (USB PD).
How is USB Type-C Better?

Currently, most devices use USB Type-A, which is bulky and only plugs into a port in one direction. Because Type-A is such a large plug, its ports are equally large. Acceptable for desktop computers, these large ports do not fit on modern, thin laptops, smartphones, tablets and cameras. USB Micro, Mini and Type-B were created to bridge this gap, and while these shapes have worked well in the past, the possibility of a new, universal cable is widely appealing. Type-C is about a third of the size of Type-A, giving it the potential to be used on various devices and thus eliminating the need for a bunch of different cables. Although, having a lot of different cables isn’t quite as revolting if you have a snazzy management system.
What is USB 3.1?
USB 3.1 is the latest standard in speed and power delivery. Plus, Alternate
-
Posted: August 30, 2017Categories: ConnectorRead more »
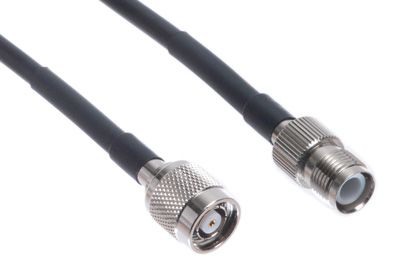 TNC connectors (Threaded Neill Concelman) are a 50 ohm coaxial connector. It is a higher performing, threaded version of the more common, BNC connector. It is used for RF communications up to 11 GHz. Due to its construction, with threaded coupling which create a secure connection, it is a great choice when working with microwave frequencies. The TNC connector is available in two varieties – standard polarity and reverse polarity (RP-TNC).
History of RP-TNC Connectors
Reverse polarity TNC connectors were popularized by WiFi manufacturers. They were looking for a way to comply with governmental regulations set forth by the FCC to limit consumers from connecting their own antennas. This regulation has largely been abandoned as the connectors are readily available to the general public. They are still a popular connector type used by WiFi equipment manufacturers.
How to Determine a RP-TNC Connector
There are a few steps to determine if you are dealing with a standard or reverse polarity connector. The first step is to determine the gender of the connector. Gender is determined by the threading of the connector. On a male connector, the threading will be on the inside. On a female connector the threading is on the outside. To think of it a different way, the male fits over the female.
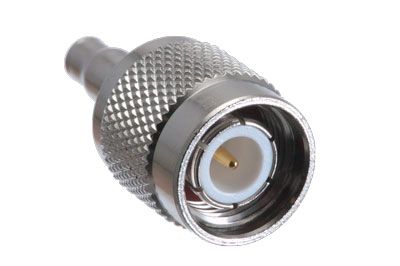
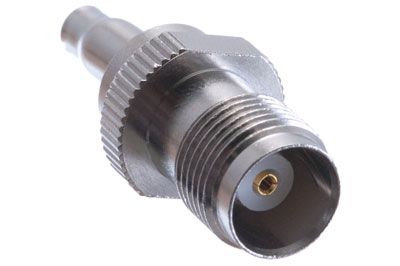
The left connctor has internal threading so it is considered a male TNC connector. The right connector has external threading so it is considered a female TNC connector.
The second step in determining the polarity of a connector is to check the pin. A reverse polarity connector will
-
Posted: August 30, 2017Read more »
The Neat Patch is a new tool for horizontal cable management. It’s innovative approach will save you time and money and will make your installations look professional with very little effort. Most horizontal cable managers amount to little more than cable duct. They allow you to run cables along the front or rear of your rack but fail to take advantage of the interior rack space. This can lead you with dangling cables if you don’t have exact lengths of cable. Excess cable can waste time and money, and will make your rack installs look messy.
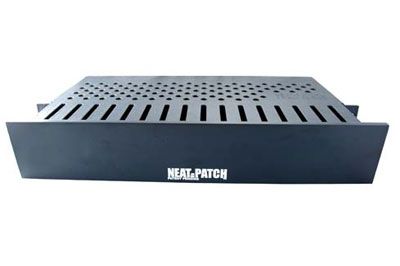 The Neat Patch cable management unit is designed to be used with any length of cable. Excess cable can be stored in the ventilated storage compartment, and only what you need remains visible. The makes your installation look neat and tidy. 1 foot patch cables are too short to connect, especially across a 19″ wide rack. While using longer cables will dangle. The Neat Patch combines traditional cable management and storage space with the use of 2 foot patch cables. This allows you enough length to patch across the length of your rack while maintaining proper bend radius and minimizing cable costs. The Neat Patch NP2 occupies two rack units and can be placed between 24 or 48 port patch panels or switches. Install on your rack like any two unit panel. The two foot cable should be looped and connected to your desired ports with the lines running through your duct and the excess stored in your organized. The neat patch can neatly store up to 48 patches.
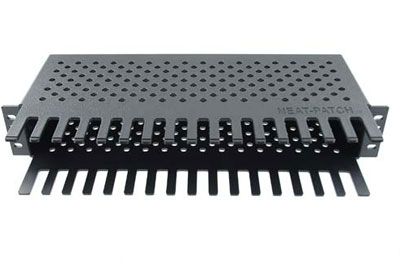
Neat Patch NP2The neat
patch is available as a stand-alone unit or in a kit. The kits come with 24 or 48 2 foot Cat6 cables. There are ten colors to choose from so you can color-coordinate your install. The Neat
-
Posted: August 30, 2017Categories: ConnectorRead more »
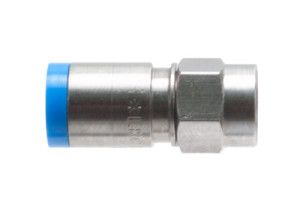
Belden compression connectors are a premium F type connector used to terminate RG6 cable,
including quad shield, tri-shield and 60% braid shield. They are quad sealed with rubber O-rings to prevent moisture from entering the cable.
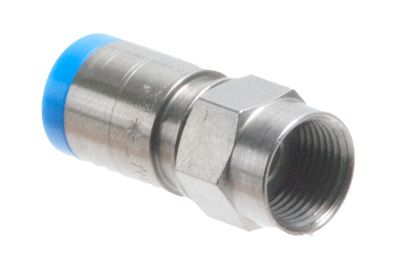
The snap and seal design allows them to be assembled more quickly than standard crimp connectors, although a compression tool,such as the IT-1000 Snap-N-Seal cable prep and terminate tool, is required. For more informationabout how to use these connectors, see the installation video below.
Features:
- Color coded with stamped part number for easy identification
- Blue sleeve
- UV resistant
- Sealed to prevent moisture
- Approved for DirectTV, Hughes Net, Dish Network
- 75 Ohm Impedance
- -30 dB loss at 1 GHz
- -90 dB RF shielding
- 40 pound minimum cable retention
- Brass, cadmium, chrome plating to prevent corrosion (NiTin)
- 360 compression keeps the connector firmly attached to the cable
SNS1P6 Installation Tutorial
To install the SNS1P6, you first need to prepare the cable. If you are not using the IT-1000 prep tool, then you will need to strip back 1/4″ of the center conductor and an additional 1/4″ of the jacket. If you are using the tool, insert it into the strip hole and rotate the tool several
-
Posted: August 29, 2017Read more »
Spring is a time for refreshing and rejuvenating our spaces. And while the oven could probably use a clean and your blinds really do need to be washed, it’s important not to forget about the pieces of technology that we use daily. Our phones, tablets and computers are our lifelines to the Internet, meaning we use them a lot. Here are 9 tips for keeping your gadgets clean and organized so that you can avoid getting sick and improve your functionality.

Tip 1) Recycle Unused Items
Do you have any outdated tech lying around that you know you’ll never use again? Or, maybe you have older stuff that you wish you could still use. Cleaning out the things that you don’t use will free up some office space! If you just can’t part with something out of date, chances are you can find adapters or converters to make it work. Otherwise, search online for a local place to recycle old computers and other gadgets. Before donating or recycling, be sure to delete all personal information and remove any batteries.
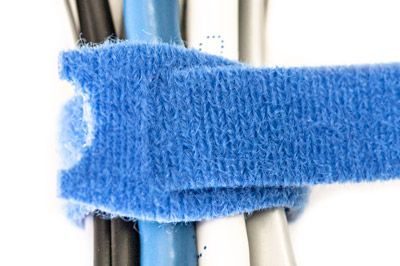
Tip 2) Organize Cables and Power Cords
Having a clear workspace can make a world of difference. Grab cable wraps or nylon cable ties to tame any loose cords. Label infrequently used items to make future use simpler. You can also make an enviable cable management system like this or that.
Tip 3) Get Rid of Germs
Our keyboards, phones and tablets come into close contact with our every day lives. And it’s been said that our cell phones carry more germs than a toilet seat, so it’s no surprise that they have made this list. Since using alcohol and ammonia on screens is damaging, you might opt for a cleaning kit like
-
Posted: August 29, 2017Read more »
ShowMeCables and our network cabling installation partners from INC Installs recently built out a new server room. We ran Cat6 cable for the main backbone. Everything was housed in two Middle Atlantic racks. We used ECore LED patch panels to connect the wire and used a variety of cable management products, including cable ties, Velcro, rear horizontal management, cable ladder and Neat Patch patch panels. Our installation team completed the project in a timely manner and did an amazing job. The installation made it easy to administer the network and keep it running. If you need help with a build out, contact our partners at INC Installs. Or, if you prefer a more DIY approach, you can stock up on materials at ShowMeCables.
-
Posted: August 29, 2017Read more »
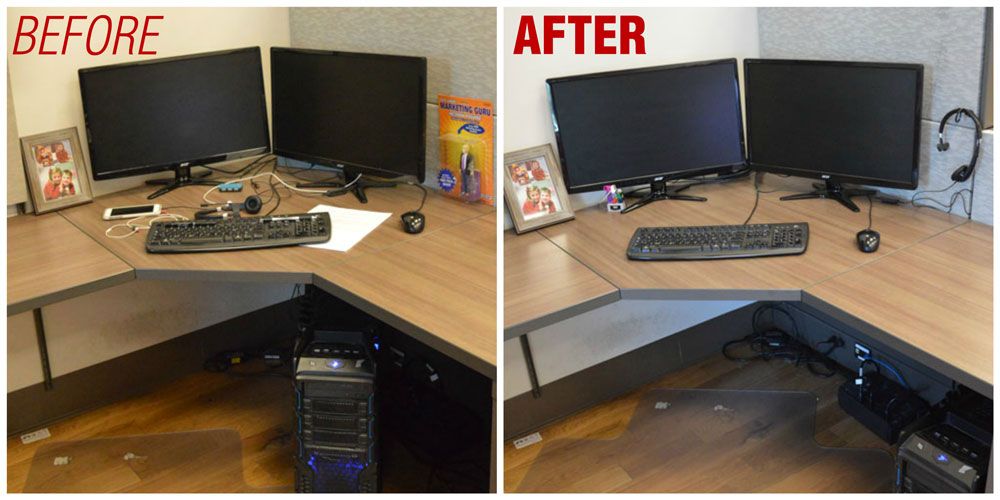
Your desktop shouldn’t cause you stress. But if you have a ton of cables getting in your way, chances are you start to feel frustrated by the end of the day. With products like Sugru on the market, the days of stray and inconveniently placed cables are behind us. In this post, I’ll show you a few ways that I streamlined my desktop’s cables.
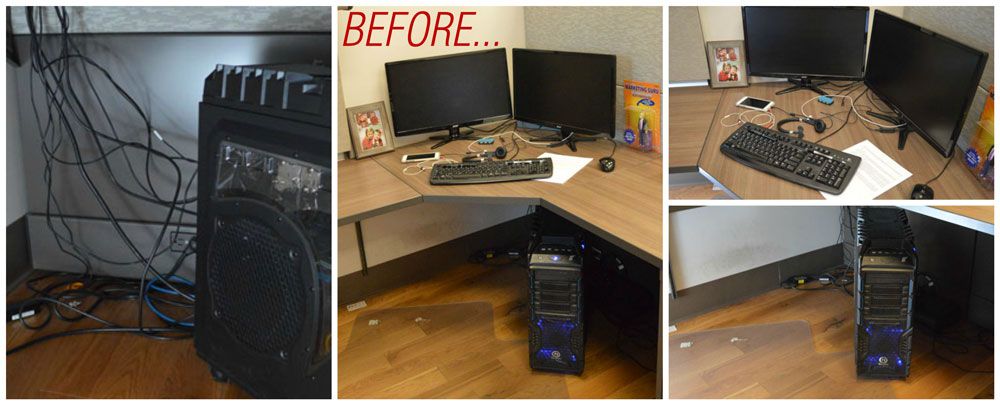
Before getting to work, you can see how messy my desk was. Underneath the desk was really the worst of it, especially since my feet could easily get caught on a cable. To start, here’s what I grabbed.

1. DVI-D Male Dual-Link Cables
2. USB 2.0 A Male to A Female Active Extension Cable
3. 3.5mm Stereo Male to Female Extension Cable
4. 6 Port USB Desktop Charger
5. 1 1/4 Inch Magnetic Bridle Rings (3)
6. LEGO mini-fig
7. 1 Inch Cable Tie Mount Pad
8. LEGO bricks
9. Super strong magnets
10. Sugru
11. Nylon cable ties
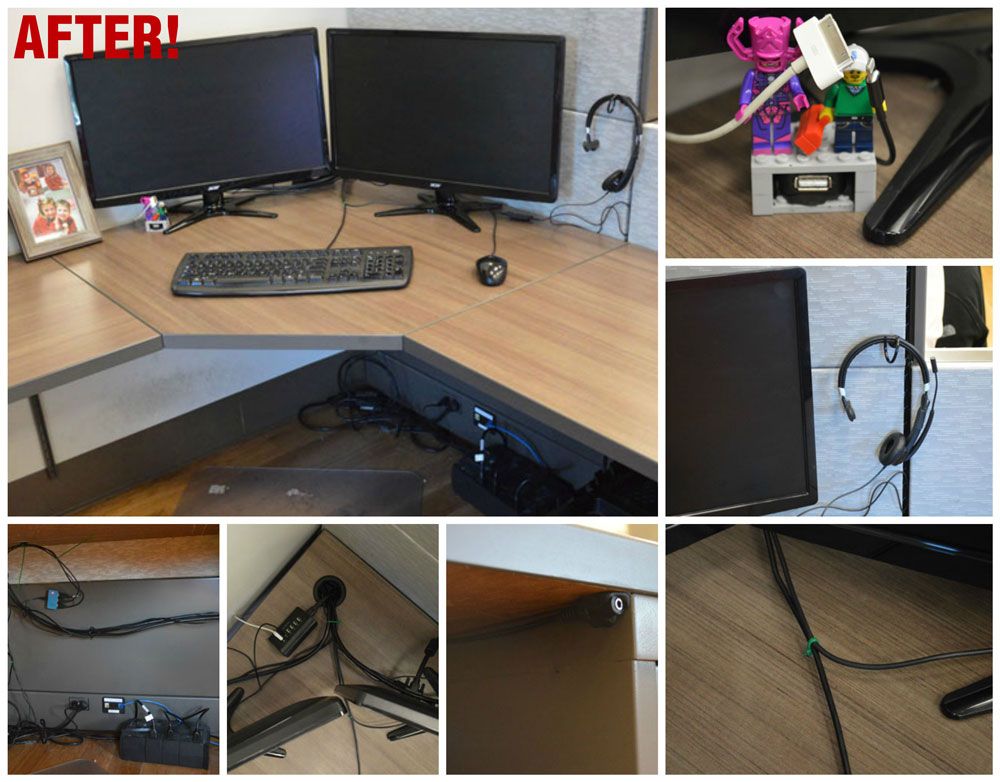
To move my tower from the center of my desk to the right side, I grabbed longer DVI cables. I also used Sugru to mount a USB hub to my cubicle to lift some of those cables off the ground. I added some magnetic bridle rings to wrangle up the cables so that they wouldn’t be freely floating around. Nylon cable ties were my best friends in this project. I used them to gather up the cords on top of my desk. A desktop charger behind my monitors makes it easier to charge my phone and tablet. I routed the cables around so that my LEGO mini-figs hold my chargers for me (how nice of them) and using LEGO bricks and Sugru, I made a little cover for my USB extender. With Sugru glue, I attached a 3.5mm extension cable under
